Croquet Microverse Tutorial
Introduction
The Croquet Microverse is a browser-based 3D shared experience platform and OS. It includes the ability to collaboratively create 2D and 3D multi-user experiences. It runs on PCs, mobile devices including tablets and smartphones, and AR/VR devices.
This guide will enable you to quickly set up Croquet Microverse and introduce you to a number of key concepts that you will need to know to create your own worlds and apps within those worlds. Not only is it easy to do this, it is incredibly fun and rewarding.
TLDR
-
Run a create npm command in an empty directory.
npm create croquet-microverse@latestIf you want to develop the core system, clone the GitHub repository https://github.com/croquet/microverse .
-
If you clone the repository, open a terminal and set the path to your new Microverse folder.
cd microverseand then run:
npm install -
Run:
npm start
-
Open browser at
localhost:9684and enter a new world. -
Connect to your text editor via the "Connect" menu item.
-
Create your own worlds.
-
Refer to Quick Start (https://croquet.io/docs/microverse), and other docs for further information.
Croquet Microverse
Croquet Microverse is a multi-user development and deployment system built on top of the Croquet Web-based operating system. This document will get you started creating your own microverses that you can deploy anywhere you like.
Croquet Microverse can be integrated directly with the tools you are already familiar with, particularly with your own editor. This enables you to directly work with and modify a live, shared Croquet Microverse session.
Croquet OS
The Croquet OS is a software system for creating and deploying multiuser experiences on the web. It lets you build real-time multiuser apps without writing a single line of server code, or deploying or managing any servers. Croquet is available as a JavaScript library that grants access to our global network of public reflectors. These reflectors provide seamless cross-platform real-time interactivity to any user with a network connection and a web browser.

Resources
Croquet.io
https://croquet.io/ is the best place to get started with what Croquet Microverse is and what it can do.
Discord
The best resource for help in developing Croquet Microverse worlds is on our Discord server where you can ask questions, view examples, and see the Metaverse being constructed while you watch. Check it out on the Croquet Discord server.
Steps Towards Creating Your Microverse
1. Run npm create or clone the GitHub Repository
To start developing your world based on a stable release, you can run in an empty directory (let us called it microverse) and run:
npm create croquet-microverse@latest
in the directory.
Alternatively, you can find the most up to date Croquet Microverse system as well as this document in the Microverse GitHub repository.
2. Start Croquet Microverse
Open a terminal on your computer and change the working directory to the new microverse folder, if you clone the github repository. (`cd microverse')
First run npm install in the directory, if you are strarting from a clone of the GitHub repo.
Then run npm start in the same directory. This will run two servers. One is the file server on localhost:9684. The other is the watch-server that enables you to inject code changes into a running session. You can also run them separately by running npm run file-server and npm run watch-server.
You should see something similar to this:
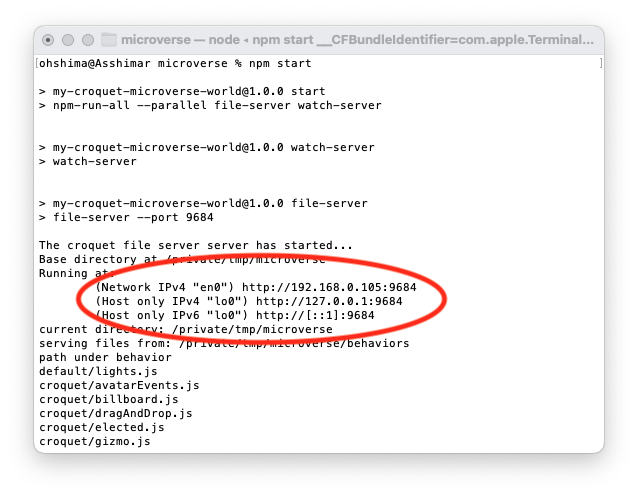
Now you can give it a try. Pointer your web browser to http://localhost:9684, or as shown in the image, something like http://192.168.0.105:9684 into the address bar.
Once you have done that, the demo world for Croquet Microverse will load and you are ready to go. The URL will change - both a new session ID and a password are autogenerated. This full URL is what allows you to share your new world with other users.
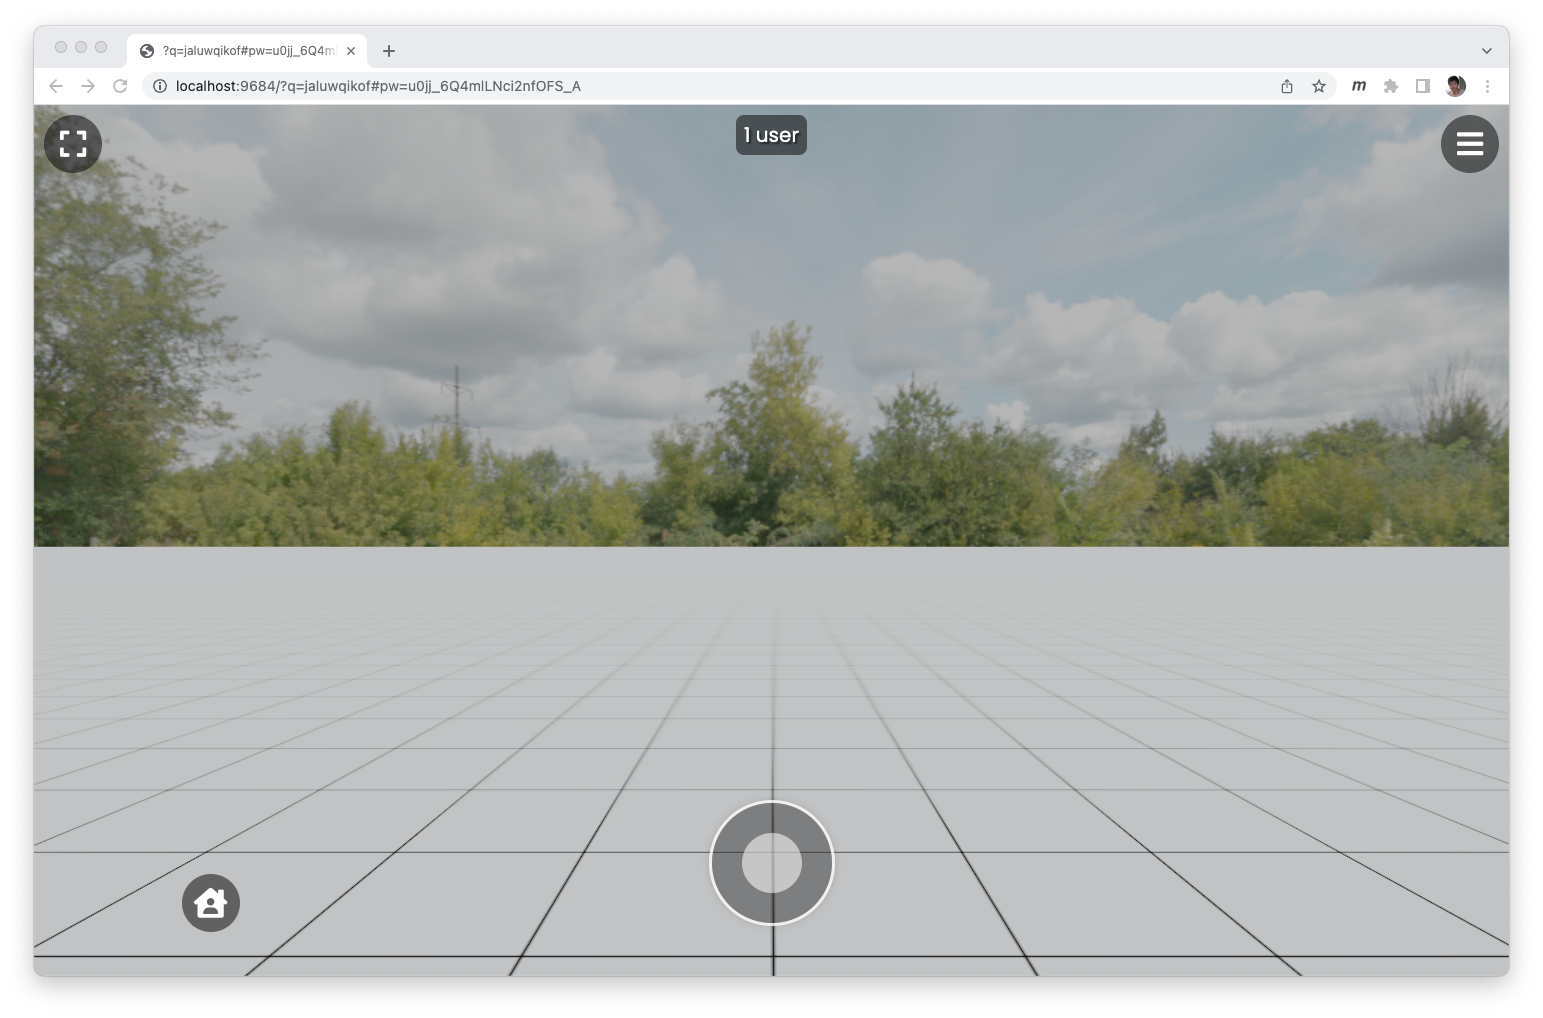
Your new Microverse awaits. If you start from the GitHub repo, you will more interesting stuff in the default world; but create-croquet-microverse is made as a minimum installation so that you can jsut start adding your objects.
5. The Watch Server
The watch server enables you to edit code from your own text editor and have it injected and run inside the Croquet Microverse while it is running without the need to reload. The watch server is automatically launched when execute npm start. You can start the watch server on its own by running npm run watch-server. The watch-server by default starts watching the directory called behaviors/croquet for system behaviors and a directory specified in the world file, typically behaviors/default or another sub directory under behaviors.
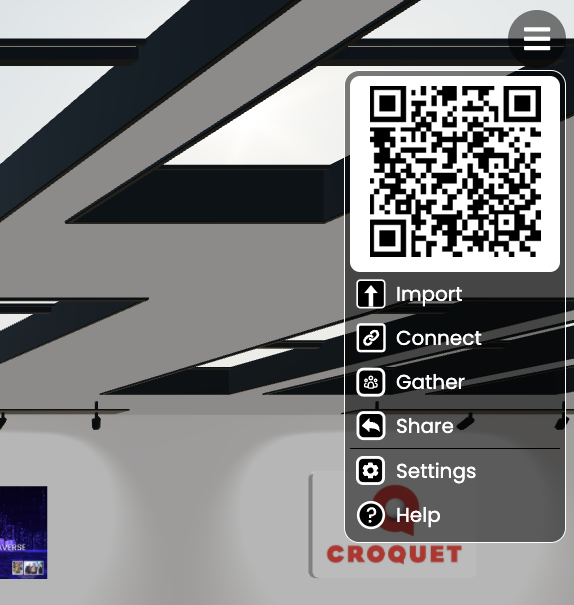
You can try out the live text editor integration with the default world at http://localhost:9684. You will see a menu icon in the top right corner. Select this and you will see a large QR code and a few other menu items.
The Connect item connects your session to the watch-server that is running locally. Now you can modify the behaviors for your world from the external text editor. When you save your changes to a behavior file, these changes are injected into the world without having to reload. The image below demonstrates adding a comment to the code and having it appear (and run if it were executable) in the code viewer inside of the Microverse world.
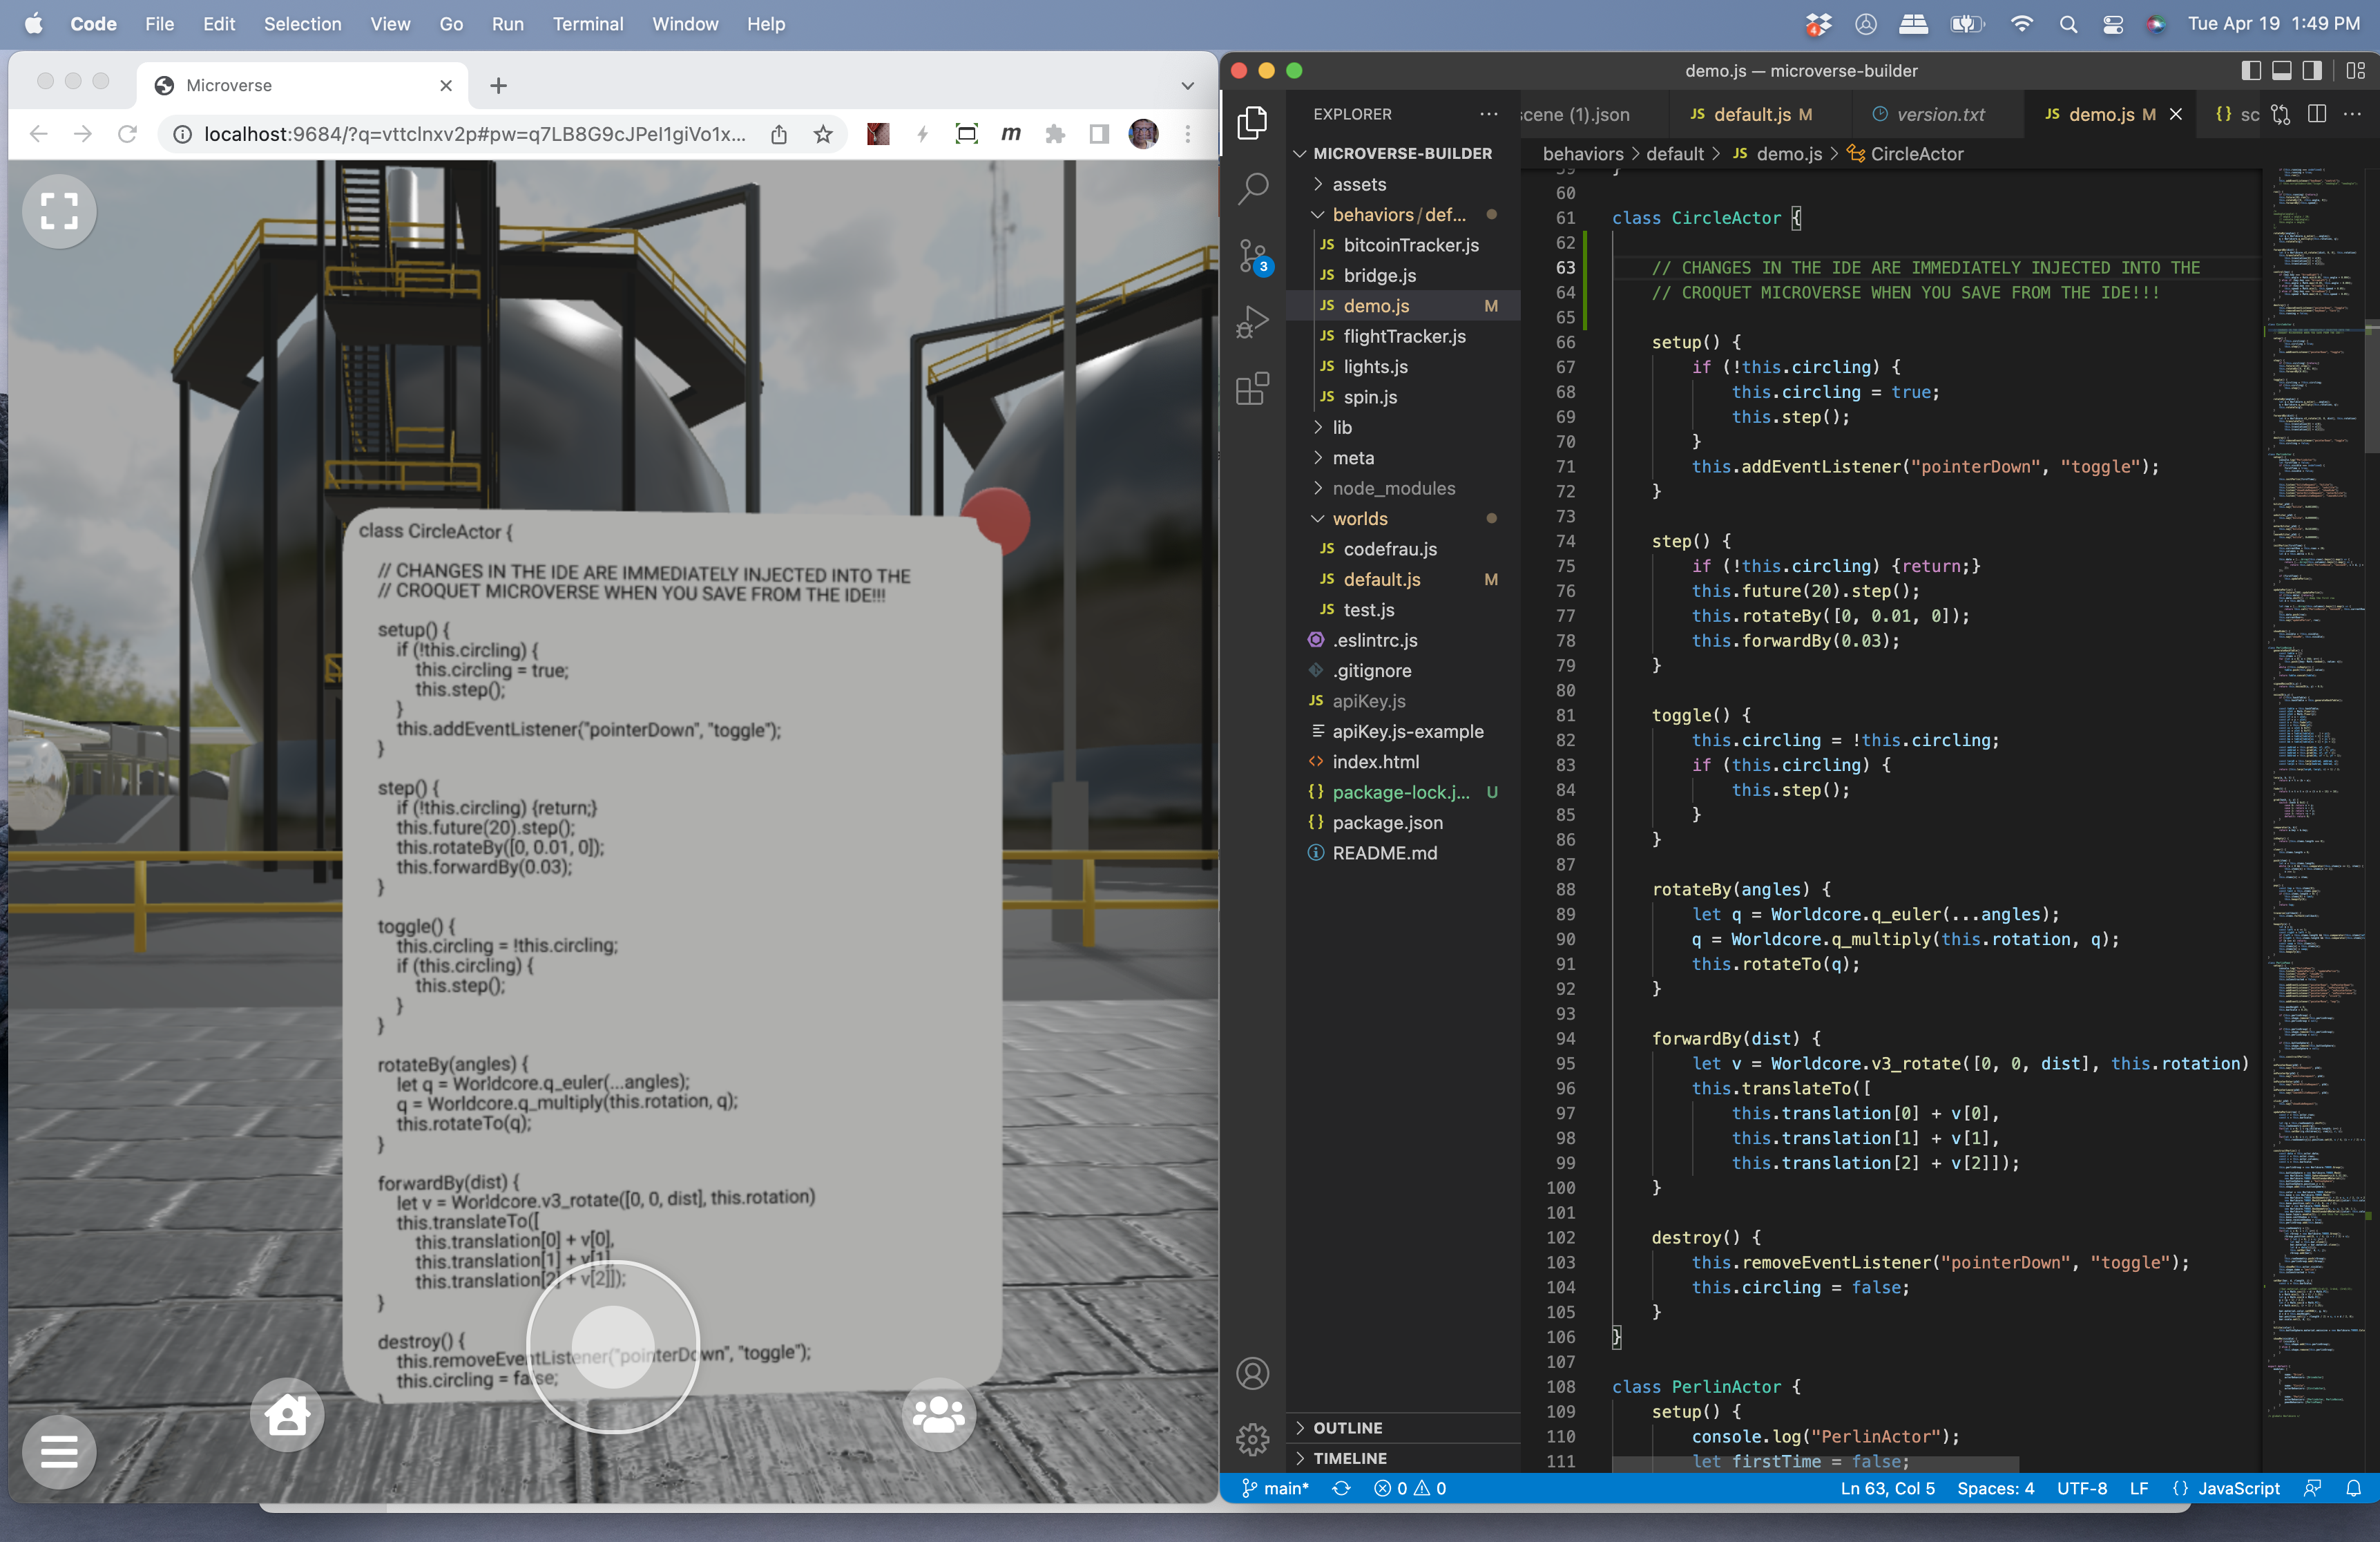
Of course you can modify the actual executable dynamically as well. This makes development within Microverse amazingly smooth and fun.
Your computer may have a firewall, such as Windows Defender, that blocks an access to port 9011 even when accessed from the computer itself. If that is the case, you need to allow to TCP port 9011 from the local computer.
Edit or add a new files
You can easily add a new file in the watched directory (by default behaviors/default or your own behaviors directory), and if the file follows the standard behavior structure, the behavior modules written in it will be automatically available.
6. Make Your Own New World
You can add a new file in the "worlds" directory (copying default.js or test.js is an easy way). If you start microverse with ?world=worldFileName, the file at worlds/worldFileName.js is used to start the world. If you started with npm create croquet-microverse@latest, editing default.js is just fine.
Worlds, Cards and Behaviors
A Croquet World is made up of a collection of cards, behaviors and 2d and 3d content. Everything in the world and, every action is multiuser by default. You can think of the world you are constructing as a template. Once a template is lauunched, it will automatically generate a new session ID which is also added to the URL. Sharing this full URL enables other users to join the world with you any time.
Cards
Every visible object in a Microverse is a kind of card. Some cards are flat like normal cards, and some are 3D models. We call them cards because we were inspired by Bill Atkinson's Hypercard, which demonstrated a new way of creating powerful applications.
Cards can have virtually any shape. As a simple example, you can define a card using a regular SVG shape. The resulting card may be flat or can be extruded - depending on the depth property.
Cards can contain other cards - for example, a button object can be defined that is “contained” by another card. Any card can contain another card, defining a hierarchy. The bottom-level card is the root card.
Cards can manage events - users can interact with them or their leaves. For example, a slider widget is a kind of card that allows a user to drag a handle back and forth. It is self contained, but will send messages about what state the slider is in as it changes. If another card is a text display card it can scroll based upon where the slider says it is. If another user is moving the slider, then the document will scroll, but the local slider will update as well.
A 2D card may use an HTML canvas as texture. A behavior attached to the card can manipulate the bitmap and create an interactive 2D content.
Layers
Layers are lists of cards in the world that correspond to how the cards can be used. A card can be on multiple lists. For example, a card with the 'pointer' property responds to and can be found by pointer events. Thus they are added to the “pointer” layer. They can also, if the developer wishes, be used as a walk surface, so they would also be added to the “walk” layer.
The current layers are:
light - contains the lighting of the world
pointer - objects that can receive events
walk - objects that the avatar can walk on top of
avatar - contains the avatars in the world
portal - this card is a portal into another world
Behaviors
Behaviors are code objects that can be applied to a card. They enable the card to interact with the user, other cards, and even the live external world. Behaviors are typically short Javascript applications that are very easy to write.
Actor/Pawn Relationship
An actor is a type of model that automatically instantiates a matching pawn in the view when its created. This means you can focus on what the actor does, and how the pawn looks, without having to worry about how they communicate with each other.
Note on Persistence
The system stores the "persistent data" about every 60 seconds if there is some activity in the world. It contains essential data to recreate the cards, but does not contain transient values of views, or avatars' states. This data is used when you migrate a session to use a new version of the core library of Microverse or the Croquet OS. When the Croquet OS detects that the same sessionId and appId combination is used with different library it starts a fresh session but re-loads contents from the persistent data.
Note that the world template file, either a js file in worlds directory or a vrse, is used only once to initialize the session. Any changes to the file after starting the world will not have any effects if you open the same Croquet Microvese session, which is specified by the ?q= URL parameter.
Deployment
There is one more step to deploy your world to your server and make it available for public.
You need to obtrain a production API key from https://croquet.io/keys and a restriction to your target URL. Create a file called apiKey.js (from apiKey.js-example) and paste your key into the value of apiKey.
You can pick your own appId. We recommend to make a unique appId.
        /* Copy this into a file named apiKey.js */
        const apiKey = '123abcd_Get_your_own_key';
        const appId = 'com.mycompany.myorg.myapp';
        export default {apiKey, appId};
(cf. the Quick Start for some more information.)
Croquet Microverse References
Croquet Microverse is built on top of a number of other systems. The most important is the Croquet OS and the Croquet Worldcore framework. It isn't essential that you be familiar with these but you may find them useful in understanding the basis of how Croquet Microverse operates.
Croquet Documentation Main Page
The Croquet OS kernel is an extremely low-latency multi-user replicated computation platform.
The Croquet Worldcore framework defines the actor/pawn architecture underlying the Croquet Metaverse cards.
Three.js provides the 3D rendering framework. It is an extremely powerful, flexible and well-defined library.
Croquet Microverse utilizes the Rapier Physics Engine. Written in Rust and running in WebAssembly, Rapier is an open source, very high-performance but easy to create multiuser, interactive physics simulations.
Constructing New Worlds
The following tutorials will provide a great start to creating your own living Microverse. Let's get started.
Copyright (c) 2024 Croquet Labs